Create an Excel mapping template
Mapping templates establish the correspondence between data contained in the Excel files to be imported, and the variables and settings of Dataflow documents. The procedures for creating and editing mapping templates are similar, so this topic only shows the creation process in detail.
For version 16.5 Update 7 and later: If the dash '-' symbol is used for zero in the Excel source file it will be interpreted as a zero during import (however, other conventional spreadsheet symbols for zero are not supported by the loader). There is a known issue in earlier versions which prevents the dash symbol to be interpreted correctly.
Template management
Template management options can be accessed from the drop-down menu in the Advanced section of the Excel Batch Import screen. The following table describes the options.
| Option | Description |
|---|---|
| New Template | Creates a new template. |
| Edit Template | Opens the selected template for editing. |
| Rename Template | Enter a new name for the selected template. |
| Delete Template | Deletes the selected template. |
| Import Template | Imports a template from a specified local file. |
| Export Template | Exports the template as a local file ('.XET' format). |
Create a new template
To create a new template, select the New Template option from the menu. In the New Template dialog, enter the name in the New Name field. To copy mappings from an existing template, check the Copy from box and select the source template from the list.
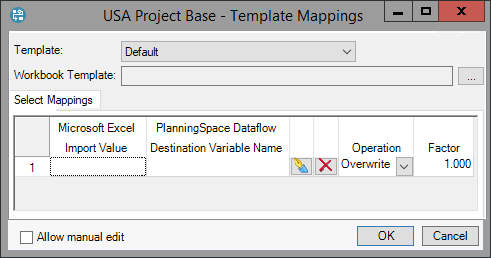
To open the new template for editing, make sure that the template is selected in the Select a template field, then select Edit Template from the drop-down menu. The Template Mappings window will be opened. An empty template (assuming you have not used the Copy From option) will appear as shown in the screenshot, with a table containing one initial row.

- First, select the Dataflow Template which will be used to create imported documents. Then, select a workbook (Workbook Template) to be used to map Excel cells to Dataflow variables; it can be one of the data files you want to import. This workbook serves as a reference and it will not be changed during the import.
- To create a mapping, click the edit button
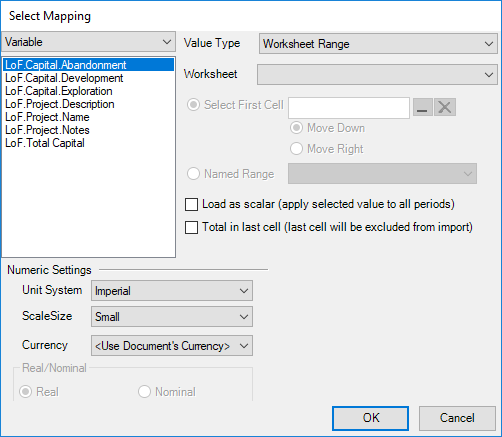
and the Select Mapping window will be opened as shown below. In the top left corner, choose which type of item you want to map: a Variable from the template, or a document Setting.
- Depending on the selected item, mapping settings will be displayed in the right-hand pane. For most items, there are several ways to specify those settings, in which case the Value Type field will be displayed, with the following options:
- If you are mapping variables, additional fields may become available depending on the variable type, as described in the table below.
- After you have created the mappings, click OK to save the mapping and close the window. Now you need to select the Operation to be performed on values during import. Choose one of the options as shown in the table below.
- The Factor column contains a multiplying factor that will be applied to imported values. Factors will be applied regardless of the operation selected in the Operation column. By default, the factor is 1. Factors can be used, for example, if you need to convert values from an incompatible unit system to a Dataflow unit system.
Note: Advanced users can manually edit the template by checking the Allow manual edit box. This option allows you to edit variable names and Excel ranges directly in the grid, and to copy cells into Excel for further editing. This option is used primarily to manage Excel references.

| Option | Description |
|---|---|
| Import Date | Sets the date on which the import was performed as the item's value. |
| Import User | Sets the name of the user who performed the import as the item's value. |
| User Entered | Opens an input field Enter Value where you can specify the value (text, numeric, etc). |
| Workbook Range | Opens a list of named ranges found in the workbook template. |
| Worksheet Range | Opens input fields where you can select a worksheet and specify a cell range or a named range. |
| Option | Description |
|---|---|
| Load as scalar | Check this box to apply a single value to all periods. |
| Total in last cell | Check this box if the last row in the Excel file contains total values; they will be ignored during import. |
| Unit system | Unit system for the imported data. |
| Scale size | Unit scale for the imported data. |
| Currency | The currency of the imported data. If the Excel source data and the Dataflow data are in the same currency, then use the default setting Use Document’s Currency (the loader will assume that the source currency is the same as the currency of the mapped Dataflow variable). If the Excel source and the Dataflow data are not in the same currency, then use the selector to specify the Excel source currency. A currency conversion will be applied, and there are two options for this based on the batch import settings Apply Currency Settings for new documents or Override Currency Settings for existing documents. If the relevant batch option is not checked (default), then the conversion will be based on the currency deck of the destination Dataflow document. If the relevant batch option is checked, then the conversion will be based on the currency deck specified in the mapping template and this will also be set as the document’s currency deck. |
| Real/Nominal | Value type of the imported data. |
| Conversion Settings | Imported data can be converted using Convert Rate to Volume or Convert Volume to Rate. |
| Operation | Description |
|---|---|
| Add | Adds the imported value to the current value stored in Dataflow. |
| Merge | Merges the imported value with the existing value. |
| Overwrite | Overwrites the current value stored in Dataflow with the imported value. |
| Subtract | Subtracts the imported value from the value stored in Dataflow. |
| Multiply | Multiplies the imported value by the value stored in Dataflow. |
| Divide | Divides the imported value by the value stored in Dataflow. |
